We all know that Google Ads is the best advertising platform for all kinds of brands. But do you know, using the same Google Ads you can target more than 90% of the internet users. It not only allows businesses to reach a wide range of audiences but also drives traffic, sales and leads through multiple channels. In simple words, companies can use this platform to show ads on Google search results, YouTube, partner websites, and even mobile applications. This platform offers the most advanced analytics presented in simple and accurate visual representation.
However, Google Ads has its own limitations and Google always fixes them in eventual version updates and feature additions. The limitations behind introducing enhanced conversions feature are:
- Whenever a user or browser blocks the cookies, it prevents the browser from tracking the user information. This cuts the link between the customer and tracking metrics, resulting in a tracking gap in your website’s analytics.
- Difficulty attributing conversions when users switched devices (e.g., clicking an ad on mobile but converting on desktop).
- Increased reliance on third-party cookies, which are being phased out, led to incomplete customer journey insights.
- Businesses struggled to track users without violating privacy regulations like GDPR and CCPA.
- The inability to match users accurately made creating effective retargeting or lookalike audiences more challenging.
This is why Google launched the Enhanced Conversions feature. This feature addresses all the above-mentioned issues by using secure first-party data for accurate, privacy-compliant tracking and reporting.
What are Enhanced conversions?
Enhanced conversions is a new feature of Google Ads that allows users to improve the accuracy of the conversion measurement by adding ads' first-party conversion data to existing conversion tags.
There are two ways you can use this conversion feature depending on your need.
Enhanced conversions for web: For advertisers whose priority is to track sales and events on the website. Increases the accuracy of online conversions.
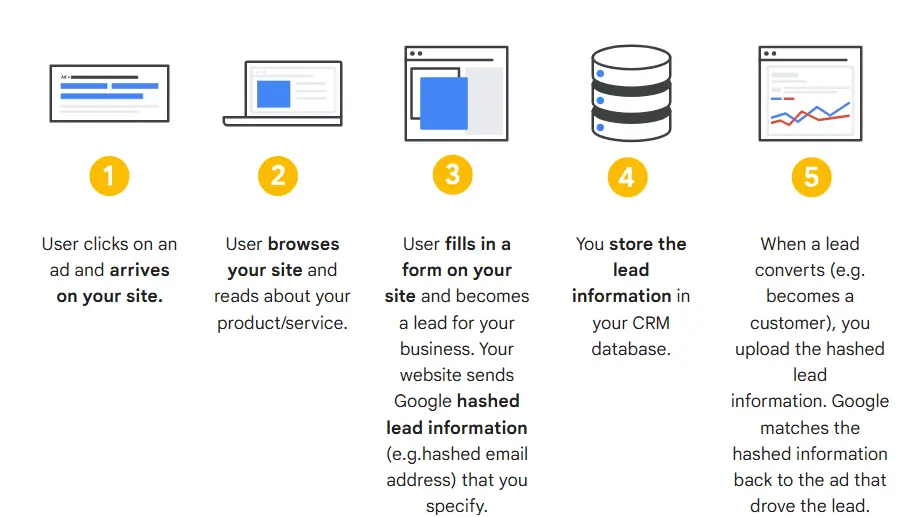
Enhanced conversions for leads: For advertisers whose priority is to track sales that took place outside of the website from the website leads. Example: phone or email.
How do enhanced conversions work and help businesses?
Customer Interaction:
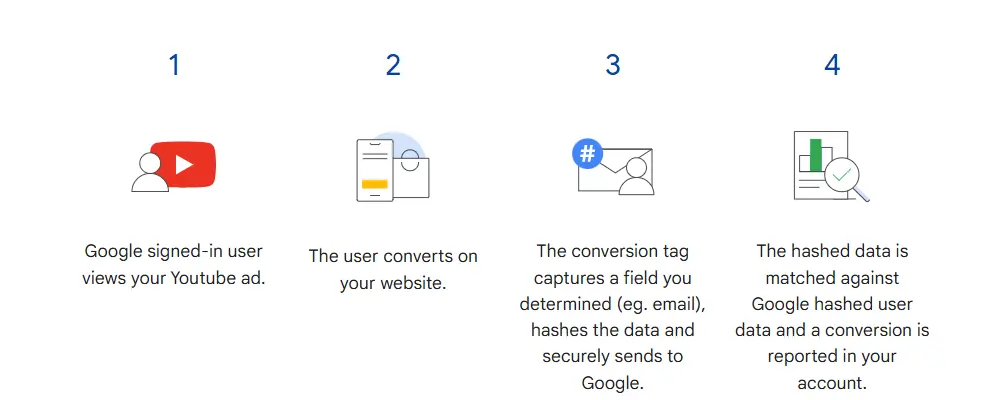
- A user clicks on your ad and visits your website.
- Example: They fill out a form or make a purchase.
Data Capture:
- Your website then collects first-party data from the user (e.g., email, phone number, etc).
- The collected data is then shared securely with your Google Ads conversion tracking setup.
Data Hashing:
To ensure privacy and security, the collected data is converted into a hashed format (using SHA256) before being shared with Google Analytics.
Example: An email like "user@example.com" is turned into a scrambled code.
Data Transfer: The hashed data is sent to Google Ads as part of your general conversion tracking.
Matching Process:
- Google Ads uses the hashed data to match the user to their Google account.
- Matches are done securely without exposing raw user data.
Conversion Attribution: If the matched user is converted(e.g., purchase), Google Ads links this action back to the corresponding ad campaign, even if the user switched devices.
Reporting and Optimization: The conversion is then recorded in your Google Ads analytics reports.
Note: Key Points to Remember:
- Secure Process: Hashing ensures no raw data is exposed.
- Cross-Device Attribution: Matches users across devices and browsers.
- Privacy-First Approach: Aligns with regulations like GDPR and CCPA.
- When match not found: Data is discarded securely if a match isn’t found.
This process helps improve campaign performance by optimizing bids and audience targeting and also ensures precise conversion tracking while respecting user privacy and adapting to the cookieless future.
How to set up Enhanced Conversions?
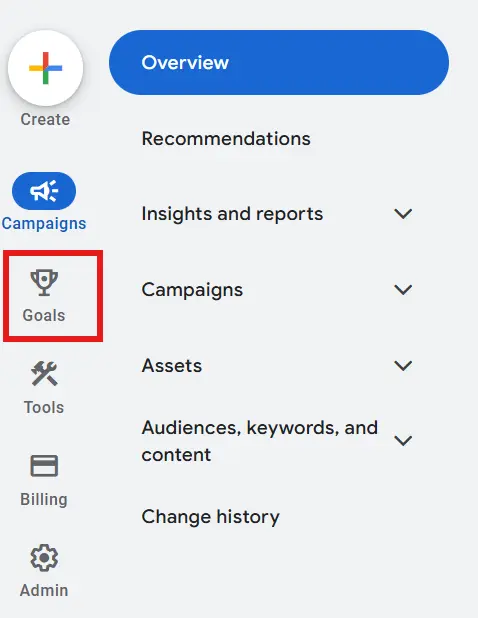
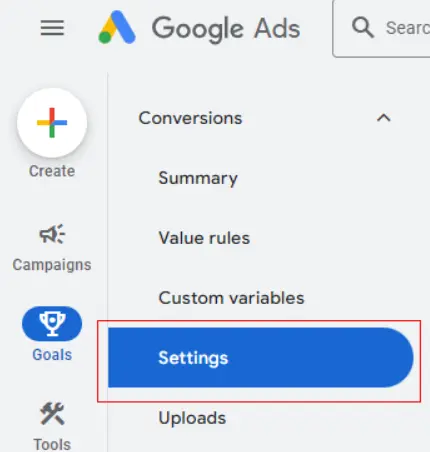
- Sign in to your Google Ads account and click on the Goals icon in the left corner.
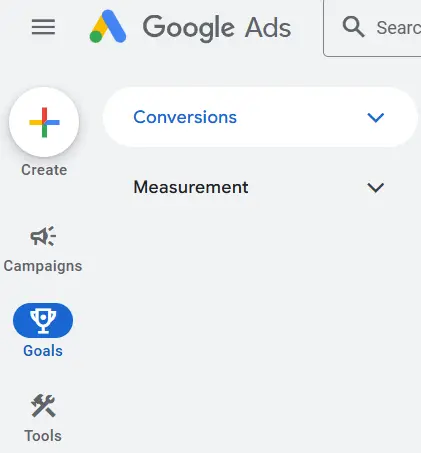
- Click on the drop-down of Conversions in the section menu.
- Click Settings.
- Expand the “Enhanced conversions for web” menu by tapping on the arrow icon.
- Check for “Turn on enhanced conversions for web”.
- Read the compliance statement carefully and enable enhanced conversions, as you must confirm that you'll comply with Google’s policies and that the Google Ads Data Processing Terms apply to your use of enhanced conversions. Click Agree to confirm your acceptance of these terms.
- Click the dropdown button to choose a method for setting up and managing user-provided data. Select “Google Tag Manager”.
- Click Go to Google Tag Manager and follow the instructions below to complete the setup process in Google Tag Manager.


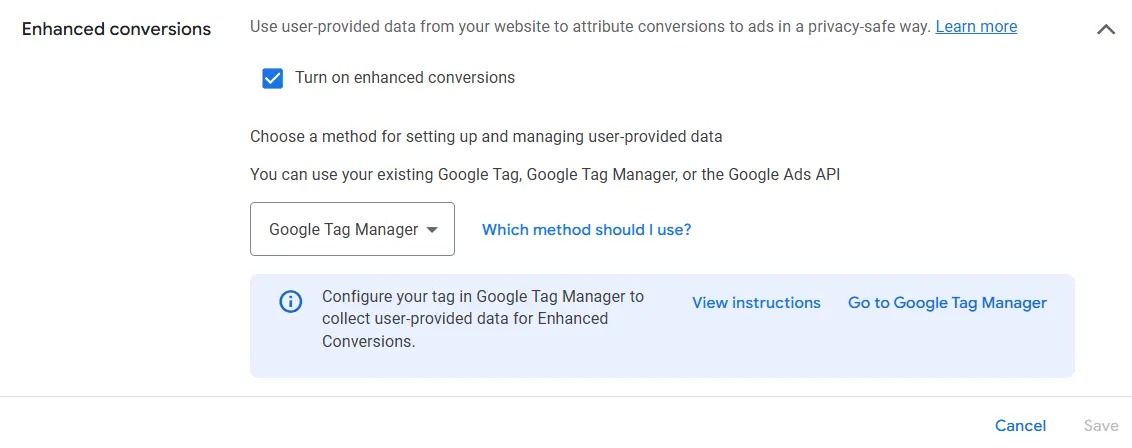
Note: If you send Google enhanced conversions data differently than what you selected in Google Ads in the past, that data might not be processed. For example, if you choose “Google tag” but send data through the API, the data sent through the API won’t be processed. If you’re not sure which tagging method to select, click Which method should I use? Enter your website domain and click Check URL to view suggestions.
Various ways to set enhanced conversions in Google Tag Manager
- Automatic collection: This is the easiest way to set things up—it lets the tag pick up user data on its own. While it’s quick and convenient, it doesn't always provide the most reliable results compared to using a bit of code or manual methods.
- Code: Adding a code to your site is a reliable option because it sends hashed customer data for better matching. This method really helps to ensure that the data is formatted correctly every time the conversion tag is fired.
- Manual configuration: With this method, you define CSS selectors or JavaScript variables with the user data you need. It offers a more tailored approach than an automatic collection but is still less reliable than using a custom Java script, especially if your website layout changes often.
How to set up enhanced conversions using automatic collection in Google Tag Manager?
Setting up conversions using automatic collection again has 2 different types based on two different scenarios, they are:
- Standard if customer info is visible on the conversion page.
- User-Provided Data Tag if customer info is entered on any of the previous pages but not visible on the conversion page.
Using the standard automatic collection
- Log in to your Google Tag Manager account.
- Go to Workspace, then select Tags from the menu.
- Edit the Google Ads conversion tracking tag you want to enable enhanced conversions for.
- Ensure the conversion ID and label match the conversion action set up in your Google Ads account.
- Check the option to include user-provided data from your website.
- In the dropdown, choose New Variable or select an existing variable if already set up.
- Select Automatic collection for the variable.
- Click Save for the variable and then save the conversion tracking tag.
Using user-provided data tag
- Log in to your Google Tag Manager account.
- Go to Workspace and select Tags from the menu.
- Click New to create a new tag.
- Select Tag Configuration and choose Google Ads User-Provided Data Event.
- Enter your Google Ads Conversion Tracking ID.
- Ensure the conversion ID and label match the conversion action set up in Google Ads.
- In the dropdown, select New Variable.
- Choose Automatic, name the variable, and click Save.
- Under Triggering, click the plus icon to add a trigger.
- Choose Trigger Configuration and select Form Submission.
- Note: Select "Form Submission" to ensure enhanced conversions work properly.
- Choose All Forms and click Save.
- Save the Google Ads User-Provided Data Event tag.
How to set up enhanced conversions using manual configuration in Google Tag Manager?
In order to set up enhanced conversions using manual configuration, you have to find the conversion variables first. Go to the targeted page where user provided data is entered. This may be on the conversion page if it's a product based business and the page before the conversion, such as the form submission page for service-based businesses.
How to find the conversion variables?
- How to find the conversion variables?
- Find the customer information you want to collect, such as email or phone number.
- Ensure at least one required field is visible: email (preferred), or a combination of name, postal code, and country for address, or phone number.
- Use Google Tag Manager to set up the enhanced conversion tag with the custom selectors or data layer variables to securely send the information to Google Ads.
After determining the customer data on the page, follow the below-mentioned steps. use:
Standard Manual Enhanced Conversions
When you already have a conversion tracking tag set up and just need to add enhanced conversions manually.
Tag Used: Modifies an existing Google Ads conversion tracking tag.
Trigger Setup: Relies on the existing trigger points linked to the Google Ads conversion tracking tag.
Implementation: Directly updates an existing conversion tracking tag by integrating it with enhanced conversions.
- Open your GTM account and go to your workspace.
- Go to Tags and select the Google Ads conversion tracking tag you want to update and click on edit the tag.
- Ensure the conversion tracking ID and label in this tag match the ones in your Google Ads account where enhanced conversions are enabled.
- Check the box for Include user-provided data from your website.
- In the dropdown, select New Variable or use an existing one if already created.
- Choose a Manual configuration for the setup.
- Review the User Provided Data section, where all possible customer data fields are listed.
- For each user data field (e.g., email or phone), select New Variable from the dropdown.
- If your data layer already contains the required data, you can select the existing variables instead of creating new ones.
- Select DOM Element as the variable type.
- Name your variable for easy identification.
- There are two options, CSS selector and ID, we choose ID because it gives a unique value.
- Leave the Attribute name field blank unless you have specific requirements.
- Save the variable.
- Save the updated Google Ads conversion tracking tag.
- Check the preview and test the connection. If it works, click publish.
Manual Enhanced Conversions with the User-Provided Data Event Tag
When the user data appears on a specific event (e.g., a form submission), a separate tag is required for capturing this data. So create a new tag on this particular page and fill in the Google Ads Conversion Tracking ID. Also, make sure that the conversion action has the same tracking ID and label as the conversion action.
How to set up enhanced conversions using the code in Google Tag Manager?
Once you have the necessary customer data store this data on the targeted page as global javascript variables. This allows enhanced conversion tags to use the data, but only when email, address, or phone is available.
Now, Google automatically hashes this data or you can do it manually. You might wonder, why go through all the stress when Google does it for you at no extra cost? Well, manually hashing data is more secure, it gives you more control over the process. This is chosen by organizations with strict compliance or government policies. Here are steps to normalize the data:
Steps to Normalize, Hash, and Upload Enhanced Conversion Data
1) Prepare User Data:
- Normalize user data like email, phone number, and mailing address to a consistent format (e.g., lowercase email without spaces).
- Hash this data using the SHA256 algorithm to ensure privacy.
2) Create Conversion Adjustment Objects:
For each conversion that needs enhancement:
- Include the order_id matching the one sent during the original conversion.
- Use the normalized and hashed data to create up to five unique user identifiers (e.g., one for email, and one for phone).
- Specify the adjustment type as ENHANCEMENT.
3) Specify Conversion Action:
- Link the conversion to the appropriate ConversionAction (a type of WEBPAGE) you created earlier as part of your setup.
4) Include Optional Details for Better Accuracy:
- Provide the exact date and time the conversion occurred, including the timezone offset, in this format:
                                        YYYY-MM-DD HH:mm:ss±HH:mm
Example: 2022-01-01 19:32:45-05:00
5) Upload the Data:
- Use the
ConversionAdjustmentUploadServiceto send your enhanced conversions to Google Ads. -
Set
partial_failureto true, so if there are any errors, other valid adjustments will still be processed.
6) Timing is Crucial:
- Upload the enhanced conversions within 24 hours of the original conversion. Ideally, upload them several minutes before the 24-hour mark to account for any clock differences.
7) Review Your Uploads:
- Check the upload results to ensure all data was processed correctly. Address any errors promptly.
Once you have uploaded the, you now have to create custom javascript in Google Tag Manager. Follow the below steps to create one:
- Sign in to Google Tag Manager and go to the Workspace.
- Select the Google Ads conversion tracking tag you want to enhance or set up a new one.
- Ensure the tracking ID and label match the conversion action enabled for enhanced conversions in Google Ads.
- Click Include user-provided data from your website and select New Variable.
- Choose Code and select Custom JavaScript as the variable type.
- Copy and paste this JavaScript code into the custom Javascript variable:
                                            function () {
    return {
        "email": yourEmailVariable , // replace yourEmailVariable with variable name that captures your user’s email
        "phone_number": yourPhoneVariable , // repeat for yourPhoneVariable and following variable names below
        "address": {
        "first_name": yourFirstNameVariable ,
        "last_name": yourLastNameVariable ,
        "street": yourStreetAddressVariable ,
        "city": yourCityVariable ,
        "region": yourRegionVariable ,
        "postal_code": yourPostalCodeVariable ,
        "country": yourCountryVariable
            }
        }
}
Code samples for normalized and hashed variables:
Please keep in mind that you can either directly input a string into the field or utilize a function rather than relying on variables.
<script>
    gtag('set', 'user_data', {
        "sha256_email_address": yourNormalizedandHashedEmailVariable,
        "sha256_phone_number": yourNormalizedandHashedPhoneVariable,
        "address": {
            "address.sha256_first_name": yourNormalizedandHashedFirstNameVariable,
            "address.sha256_last_name": yourNormalizedandHashedLastNameVariable,
            "city": yourCityVariable,
            "region": yourRegionVariable,
            "postal_code": yourPostalCodeVariable,
            "country": yourCountryVariable
        }
    });
</script>
If you want to submit hashed user data values, you may refer to the example snippet below:
async function processUserData() {
    const userData = {
        'sha256_email_address': await hashEmail(email.trim()),
        'sha256_phone_number': await hashPhoneNumber(phoneNumber),
        'address': {
            'address.sha256_first_name': await hashName(firstName),
            'address.sha256_last_name': await hashName(lastName),
            'city': city,
            'region': region,
            'postal_code': postalCode,
            'country': country,
        },
    };
    return userData;
}
The phone number should follow the E.164 format, meaning it needs to have between 11 and 15 digits, starting with a plus sign (+) and country code, without any dashes, brackets, or spaces.
For each category of customer information in the code above, substitute the placeholder variables (like yourEmailVariable) with the corresponding global JavaScript variable that contains that specific customer information from your conversion page.
As a reminder, at least one of the following details must be included:
- Email (preferred)
- Address (which requires first name, last name, postal code, and country)
- A phone number can also be submitted as a standalone match key, but it's advisable to send it alongside an email.
Keep in mind that if your site does not collect one of those fields, it's better to completely eliminate the field instead of leaving it empty. For instance, a website that only gathers emails and phone numbers would create a custom JavaScript variable structured like this:
function () {
    return {
        "email": yourEmailVariable,
        "phone_number": yourPhoneVariable
    };
}
Click Save.
Conclusion
All in all, the enhanced conversions feature significantly changes how organizations measure the leads or conversions. This feature offers accurate attribution and improved campaign performance. It is definitely a great addon to the existing features of Google Ads and following the above-mentioned steps will ensure a seamless implementation journey for accurate reporting. By properly uploading and configuring the feature brands can optimize their strategies and drive better results. At Webomindapps, we can help you set up enhanced conversions for your ads, providing detailed analytics and expert assistance to optimize your Google Ads setup for maximum impact and results.
Webomindapps is a profound enterprise serving successfully since 2013. Based in Bangalore, it offers expert solutions in web designing & development, e-commerce, mobile & web app development, digital marketing, and SEO across the globe.
Quick Links
Contact Info
24, 2nd Floor 5th Cross Rd, KHB Colony, 5th Block, Koramangala , Bengaluru Karnataka 560095
+91 9353-370-081 +91 8088-749-165


![]()
![]() ©
. All Rights Reserved by Webomindapps Pvt. Ltd
©
. All Rights Reserved by Webomindapps Pvt. Ltd